Almost one out of twenty in the world are using a phone. In this I think android phone is in majority. Everybody know the the basic settings and basic feature of android. But some feature of android platform are not visible to the users. These features can be accessed with some command line Android Debug Bridge (ADB) commands. Google is offering this tool to developers to debug various parts of there application or the system. But these tool can also be used for all kind of neat and hidden tricks.
I think everybody knows some basics to use the command line. So in an attempt to teach these tweaks we have been including the steps to install ABD on your windows devices.
Setup the Android Debug Bridge (ADB)
Note: Setting up ADB on the computer is just half the equation since you’ll also need to do some things on the smartphone or tablet to accept the ADB commands.
Phone Setup
- Open the Settings application on your phone.
- Tap on About Phone option it is generally near the bottom of the list (this is hidden behind the “System” option in Google’s latest Android Oreo version).
- Then tap on the Build Number option 7 times to enable Developer Mode. You will see a small pop up message that you are a developer now.
- Now go back to the main Settings screen and you should see a new Developer Options menu, sometimes this option may be inside additional settings option etc in some smartphones.
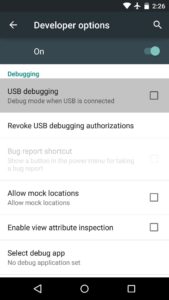
- Go inside the developer option and enable the USB Debugging mode option.


You have reached half of the phone setup process. You need to scroll down and follow the rest of the instructions.
Related Post : Watch 200+ Free TV channels for Free On Android Phone through MX Player
Microsoft Windows ADB Setup
- Download the ADB ZIP file.
- Extract the data’s of this ZIP file into an easily accessible folder (such as C:\adb).
- Open Windows explorer and browse to where you extracted the contents of this ZIP file.
- Then open a Command Prompt from the same directory as this ADB binary. This can be done by holding Shift and Right-clicking within the folder where the ADB files you had copied, then click the “open command prompt here” option. (Some Windows 10 users may see “PowerShell” instead of “command prompt”.)
- Connect your smartphone or tablet to your computer using a USB cable. Change the USB mode to “file transfer” mode. Some smartphones may or may not require this, For general compatibility it’s best to just leave it in this mode .
- In the Command Prompt window, enter the following command to launch the ADB daemon: “adb devices” if its not worked type “.\adb devices“.
- You should see a prompt to allow or deny USB Debugging access on your smartphone. Naturally, you will want to grant USB Debugging access when prompted and if you don’t want to see that prompt again tap on always allow check box.

- Finally, re-enter the command from step #6. If everything was okay in the command prompt, you should now see your device’s serial number.

Wow! You can now run any ADB command on your device! Now go forth and start modding your phone by following our extensive list of tutorials!